Showing posts with label Crafts. Show all posts

Monday, 16 September 2013

Pretty Craft Storage

After I finished my craft room transformation I wanted to make some pretty things for it. 

I love pretty!!

 However I didn't want to spend any money though.  
I'm on a thrifty spree at the minute! 

I shopped the house and found this box in the cupboard (see I knew it would be useful!)


I chose pretty paper from my collection,  I believe I got it in the Hallmark store.  


Isn't it adorable! Even better because it was free!!!


It was really easy, I used a spray adhesive on the box, after I had cut the paper to size and it fitted so well


This is it in location, I have to say I really love it, it makes me smile and it used up some of the many rolls of wrapping paper sitting around! 

Tuesday, 10 September 2013

Craft Room Transformation

I spent this weekend transforming the spare room into a guest/craft room.  I had a very small budget to work with so most of the pieces are things we already had.  Advance warning,  I haven't finished yet but I like to see progress on a project as people are doing it so that's what you guys are getting too.


This is what we had to work with, when we moved in, there was a lot of 
family coming to stay for the wedding so we just put in the bed and that was it.  


Now that I see the photos, I'm not sure I love the layout but it seems to
 give me the most room to work at the desk.


The oak drawers were in my husbands old bedroom so we got those when we moved


The green cabinet was given to me by my aunt when she was clearing out her garage,  it was scratched mdf and so I sanded, primed and painted it.  I used Morris Blue from Craig & Rose 1829 Acrylic Eggshell paints


I used these little ice buckets that were left over from the sweetie table at our wedding.  I plan to make labels for them so I know what is in each bucket.  


I found this desk in Auld tat in Ballymoney, they have some amazing pieces for sale.  


This beautiful doll was given to me by my mother-in-law at my wedding, she hand-knitted her dress and train.  Isn't she amazing!

So that is my little craft room, where I can hopefully create in
 peace without my craft stuff ending up all over the house.

So what do you think? Does anyone else have a craft room or closet?  
How do you manage your craft storage

Friday, 6 September 2013

Craft Room Inspiration

I enjoy a variety of crafts and especially love trying new ones.  The only slight downside is my house is cluttered with supplies.  I realised I needed to create a separate space in the house for crafting.

I decided to use the space in the guest room, I want it to be dual purpose - a guest bedroom & a craft room.  I've been gathering all my supplies together so that I can work out what storage I will need.

As always when I start a project I start researching, I browse magazines, the internet an blogs.  I wanted to share some of the inspiration I got with you.


I love the wicker magazine files on the shelves, I do love wicker!


Such pretty storage options!


I love this one, it's perfect for a spare bedroom.

I'm going to be working on transforming my craft room over the weekend so I'm going to show you my progress on Wednesday.  

Saturday, 31 August 2013

Lavender & Vanilla Homemade Sugar Scrub

I'm having a pamper night this evening, I always like to start off with a good body scrub.  It helps to exfoliate and leaves your skin glowing.  

They are so easy to make at home and they are so cheap.  


Ingredients

1/2 cup Sugar
1/4 cupOlive Oil
4 drops Lavender Essential Oil
2 drops Vanilla Extract


Mix all together in a bowl until you are happy with the consistency and smell


Let me know if you give it a try! 

Friday, 30 August 2013

Easy No Cook Playdoh


When we were kids my Mum used to make homemade playdoh with us to keep us amused during the holidays. She runs a day nursery now and she still uses this same recipe to make playdoh for her kids there. I have no idea where she got it originally but I had a look around online and it is really similar or practically identical to a lot of other playdoh recipes out there so I'm guessing this method is pretty foolproof. It isn't sticky or too hard and will stay soft for a few weeks if kept covered in between playtimes. I make it when I'm babysitting and the kids just love it (though I think I enjoy it more than they do haha!) and we add all sorts of things like sequins and rice to the dough. Glitter is awesome too but be aware that it gets everywhere!


First things first, you will need:

 a large bowl
either an actual cup or a 1 cup measuring cup
a teaspoon 
two tablespoons
a wooden spoon


Ingredients:

1/2 cup of salt
2 cups plain flour
2 tablespoons of cream of tartar
2 tablespoons of oil ie. vegetable/sunflower/groundnut oil
1 teaspoon of glycerine
1 and a half cups of boiling water
Food colouring

Optional extras: rice/glitter/sequins for texture.

This will make one batch of dough in one colour. Its so quick to make that I usually make three or four batches in different colours so we can get a bit more creative!

Method:


First add all your dry ingredients to the bowl and give it a stir.


Then add the oil and the glycerine.

 
The add the boiling water and the food colouring. The easiest way to add the colouring is to add it to the water before you put the water in the bowl, that way it will dissolve in the water and when you mix it in the colouring will be evenly distributed throughout the mixture and you won't have to knead it in after (which takes forever!)


This is how it looks when all the ingredients are added. Stir everything together, it will be sticky and gooey at first but it will come together pretty quickly. 


When it starts to form a ball you can take it out of the bowl and knead it for 30 seconds or so to make sure everything is incorporated. If it is very sticky add a pinch of flour and work it in, if it feels a little dry then add a splash of water. This recipe is a dream though so it should be perfect. The whole thing should take no longer than five minutes from start to finish!


Now is the time to add any extras like rice or glitter or even sequins! 
I love adding sequins or small craft stars to playdoh, kids really enjoy the different textures.


I made this a few days ago for a couple of kids and they had a blast. We made pink, blue, green, orange and lilac as well as the yellow. Add a few cookie cutters, plastic cutlery and a jar of coloured lollipop sticks and you're sorted.


I like to add real world/grown up things like the cutlery and bun cases too as I find that they like to pretend to make delicious treats for everyone. 


 We even used a cake stand to display them afterwards which they loved.


So that's how we make playdoh in our family, 
a super easy way with no cooking involved that takes just five minutes.

That's it from me for today, I'll be back Wednesday next week with a great roast chicken recipe so check back for that. 
Any questions just shout out in the comments below :)


Friday, 2 August 2013

Our Wedding - a sneak peek.


*Photos by Trevor Porter Photography*

It's funny how you get to a certain age and all of a sudden your life is full of weddings and babies.
Pretty much all of my very close friends have gotten married in the last 2 years or so and they have all been wonderfully fun and unique in a ton of ways.

These are some of my favourite images from our wedding. I can't believe its been nearly two years!


One thing I've found in the past decade is that there has been a definite shift to a "less is more" mentality when it comes to the size of weddings here...is it the same everywhere else?
 With huge traditional weddings with large wedding parties seeming to be a thing of the past, we definitely felt like the odd-couple-out when we were planning our day.
Most of our friends just couldn't understand why we wanted such a huge wedding.
The thing is, we both come from big, very close families and rather than try and cull the numbers we just decided to roll with it and invite absolutely everyone we loved.
It was the best decision we could have made!


We got married on a really sunny December's day in 2011, in the same church my parents got married in,
on the main street of our home town.
We had a big bridal party with six bridesmaids, three flowergirls, two pageboys and a ton of groomsmen.
It meant a lot of running around sorting stuff out in the run up to the wedding but on the day I was so very glad because it was so much fun having everyone around us.


Having all the people we love there with us on the day made it so much more special, so choosing to up our numbers rather than spend extra money on certain things was definitely the right call for us.
At the end of the day I wanted to remember the people we shared our day with, not what the chairs looked like or what the favours were.


We did a lot of things ourselves including the invites and our bouquets. They were fabric flower and brooch bouquets and took us about 10 months to do all seven of them. They were definitely a labour of love but I'm so glad we put in the effort. They photographed beautifully on the day. I may try and get the courage up to do a tutorial on here someday!


Our photos ( which we love!) were done by the very talented and super lovely husband and wife team of Trevor and Wendy Porter. They were amazing on the day and so much fun to be around which was awesome.
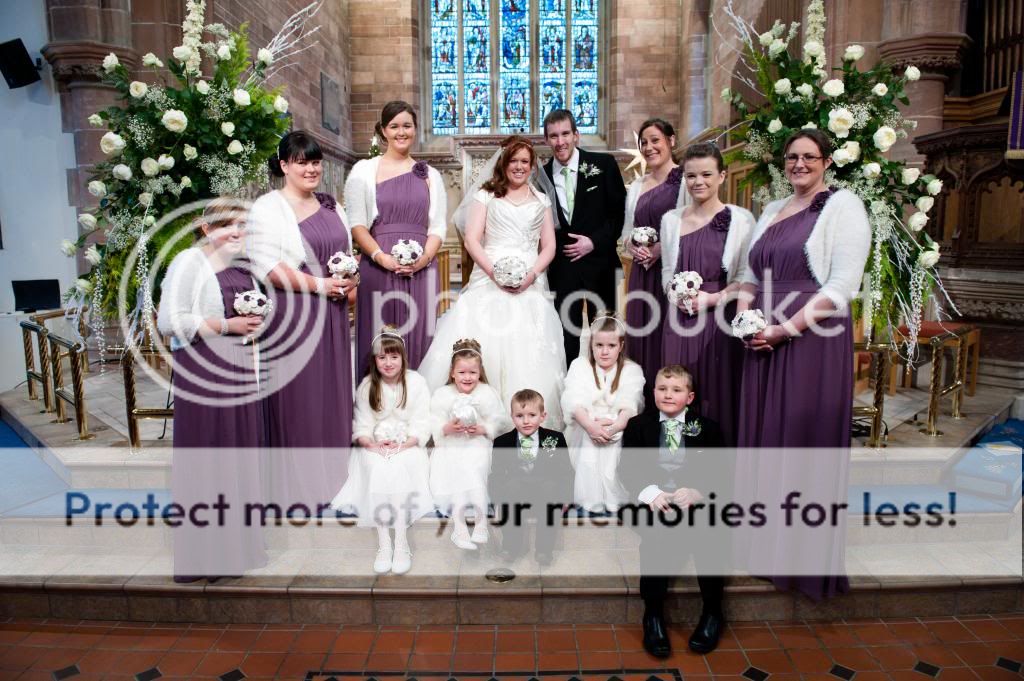
These are some of my favourites.


This is the photo that we had framed for our house. I just love it. 


It really was an amazing day and I'm so glad we put so much of ourselves into it and worked so hard on it all. Worth every moment!


Friday, 19 July 2013

Granny Stripe Blanket


Last year I set myself a challenge of learning a few new things. I wanted to learn how to make some good food from scratch, how to use my dslr and I really wanted to learn how to crochet!

I already knew how to knit (badly I admit) so I started there and improved my knitting skills first, I made a few scarves and some baby blankets which I loved doing. Then I started looking around the net for crochet tutorials and came across the most beautiful, inspiring blog - Attic 24
Lucy is amazing and I immediately fell in love with her granny stripe blanket. I ordered the Stylecraft Lucy pack from Deramores and could not wait to get started!

Now admittedly taking on the task of making a huge blanket for my very first crochet project was perhaps a little nuts! However Lucy's instructions were awesome and after a few practice rows I just jumped right in went for it.

The foundation chain was torturous and the next couple of rows were fiddly and slow but I soon got the hang of it. I left out the red colour from the pack (I knew I wanted to do a purple border and it seemed to clash) but used the rest of the colours pretty evenly. 

This is how mine turned out.


It took me five months!! About four for the blanket and one for the edge. I didn't work on it every day, and there were weeks I didn't touch it at all (though only a few) but I was so proud of myself when I finished it. After a wash in the machine it became all soft and drapey and I fell I in love with it even more. 


Right now I'm working on my second blanket, in various shades of blue and a few green. 


I think I might do a dark blue or navy border. What do you think? Or maybe the sage green? I also decided to do varied width stripes just for a bit of variety since there aren't as many colours.


I'm crazy about crochet now and that's partly due to Lucy's great tutorials so I owe a huge thanks to her! If you haven't checked out her fabulous blog yet make sure you do!

Has anyone else made a granny stripe blanket? 
Or any of Lucy's other crochet goodies? 
I'm always on the lookout for new blogs to read 
so if you know of any good crochet/knitting/yarn blogs let me know!
Blog Designed by The Single Momoirs